Tips on blocking & finishing crochet and knitwear projects
Finishing garments and more
About a 10 minute read
I hope you have a cuppa in front of you because finishing and blocking your finished objects is a big subject area and if you know me, you know that I am thorough and passionate about this subject! I should change my middle name from Bella to Robust.
To my mind, there are four key areas to properly finishing off a project. I'm going to talk through a garment, but this applies to many other projects too, not just things to wear:
- Washing and blocking your project
- Joining seams - including weaving in ends
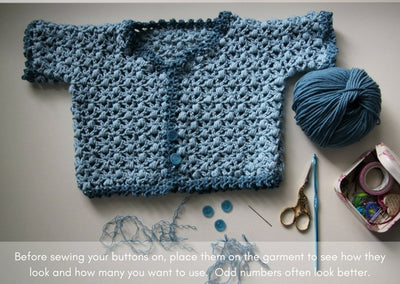
- Adding the trims/ buttons
- Recording your process - this may seem like it isn't part of the finishing process but for me, I must record all of the information on a project (tension pre and post blocking, weights of yarns used, pattern changes) before I start wearing or give the item away. It helps me to repeat patterns with ease and is a great reference back to what I have done in the past and the yarn used.
I am going to use the journey of this gorgeous baby cardigan to show you how I wash, block, seam, choose trims and record the details.

If you only need to know about one of these areas, then feel free to scroll to that point. Otherwise, sip your tea and enjoy the nuggets that I have learned over the last few years and share with you in this blog post.
Why go the extra mile?
I completely understand the excitement of finishing that last stitch in something as big as a garment and feeling like "that is it, I have completed it" when the reality is that you most likely still have a way to go before you can put it on.
At this point, lots of people get despondent and either put the garment panels aside for another day or rush the process so that they can start wearing them. However, I would say that washing, blocking and finishing is the part that can make or break the final look.
Washing means that you have a clean item that will be ready to wear when you have sewn it up, blocking it will mean that the size is even across your item and choosing the right trims can springboard a garment from looking okay to looking amazing!
What I can promise you is that putting the proper amount of time and effort into this final part of the process is far more likely to lead to a beautifully finished item that is well constructed and looks as good as possible.
Why spend upwards of 30-80 hours crocheting or knitting something to then rush the bit that completes it? Also, you may be like me and have that giddy kipper moment when you try your handmade garment on for the first time and it is either something that you instantly love and wear, or it goes to the back of the wardrobe.
Let's help it be something that is instantly loved and worn by taking the time to finish it off properly.
Washing & blocking
The three main blocking methods are wet, steam and spritz blocking and different yarn types suit different types of blocking.
Wet blocking (woolens and linen):
For wool, linen or anything with a wool blend (personally 30%+ wool) I would wet block the item.
1 - Wet blocking is where you submerge the items in lukewarm water containing a wool wash (preferably one with lanolin to recondition your wool) and leave it for twenty minutes or so. This is enough time for the water to penetrate the yarn. You mustn't agitate the yarn, so don't prod it, over handle it etc. If you do this, or if you use water that is too hot, you run the risk of felting your wool. Just leave it be in the soapy water for a while.
2 - When it has had 20 minutes, drain the water out and very gently rinse the project with lukewarm water and without agitation. The beauty of wool washes is that they aren't very soapy and so only need a quick rinse and some don't need rinsing at all.
3 - The next stage is to take out as much excess water as possible by squeezing the project. This is a gentle squeezing action, not a wringing action. When you can't get any more out, place your project onto an old towel, roll it up making sure that all of your project is on the inside of the towel roll and then stand on it. The weight of your body will help to transfer a lot of the excess moisture from your project to the absorbent towel. Take your project out of the towel and get ready to pin it out.

4 - You don't have to use blocking mats, you can pin out onto a towel on your carpet or even on your bed. I just really like using mats because it makes it portable, which means that I can pin out standing up by placing the mats on my kitchen counter or dining room table and I can be precise because the mats that I use have straight edges.
5 - If you are blocking a garment that has been created in panels that have to be finished (stitched or crocheted together) then the more precise you are with your blocking measurements, the easier the job of finishing will be. I like to start with the biggest piece (usually the back panel) and pin that out first. The next panel/s are then pinned out to the same measurements (if you scroll down to the photo in the 'Recording your projects' part of this blog it shows the measurements that I blocked a baby cardigan out to). I place pins diagonally (as you would put tent pegs in) slightly in from the edge of the project as this helps to alleviate the potential for a bevelled edge. An adult-sized garment may need 100+ pins to block the panels out correctly.

Try to ensure that all of your measurements are even and that you aren't being too aggressive with your blocking. Ideally, you should be pinning out to the required size - possibly a smidge larger to allow for sewing/crocheting up the seams.
I am often asked whether I sell blocking wires. I don't and I won't. At the beginning of my crochet journey, I bought some to use. Unfortunately, the tips of the wire didn't have a straight cut and snagged every time I tried to thread it through the shawl I was attempting to block. It would have been fine with an open-lace shawl, but I don't often make those.
The other reason I don't sell them is that the ones I owned whipped around when they uncoiled and I felt they were dangerous. For these two reasons, I stick to using and selling good quality pins.
If you want to see the entire wet blocking process, I have created 'Wet Blocking your Woollens: a comprehensive guide' and it is available on YouTube.
6 - When your project is still damp to touch, check that the edges aren't bevelled. As your project dries, it will contract and this can lead to bevelling. If this has happened, move the pins in a couple of mm to allow the fabric to boing back into position. You can move it with your fingers if it needs a little encouragement. It can take a good couple of days for your project to dry out completely and the pins should not be removed until the project is completely dry.
Steam blocking (acrylic, cotton and bamboo):
This method is particularly good for acrylic, cotton and bamboo yarns. Use the pinning out method given in bullet point 5 above before you steam block the project.
If you don't own a steamer, the next best thing is your steam iron. A word of caution though, do not let the iron touch the project as this will have the opposite effect and deaden your stitches, losing definition. Ensure that the iron is hovering over the project and press the steam button. This allows the moisture from the steam to get into the project and because you have already pinned it out into the required shape, that is the shape that you 'set'.
A good tip is to add some extra pins onto your project before steam blocking it so that iron is unable to touch the yarn. I would tend to use metal or glass headed pins for steam blocking but you need to be careful not to touch them when you have just steamed over them as they retain the heat from the steam very well.
To steam block cotton and bamboo, you follow the above steps to pin your project out to the required size (don't add extra pins to stop the iron from touching the yarn), place a wet but not sopping wet cotton cloth (a tea towel or pillowcase) on top of the pinned out project and run a hot iron over it until the top cloth is dry. This forces steam into your cotton project and sets the stitches.
Spritz blocking (silk):
Pin your project out to your desired dimensions (see bullet point 5 under 'Wet blocking'), spritz it with water to make it damp but not sopping, and leave it to dry before taking the pins out. Be warned, wet silk can smell really bad.
Blocking Equipment
Here are the blocking items that I use:
Mats - you will need 4-9 for a garment (six also blocks a really big shawl). Buy here.
Pins - I use 100+ for shawls and garments (Size 2 for lace - 4ply projects, Size 4 for 4ply to aran projects, Size 7 for chunky+ projects and aggressive blocking). Buy here.
Wool wash - I use a wool wash bar because they are very economical, and contain lanolin which reconditions my woollens (there is also a no lanolin option). The bars are packaged with 0% plastic too! Buy here.
Joining seams
So, you have blocked your project into matching panels so that sewing/crocheting the panels together should be easy with well-aligned stitches from one panel to the other.
Taking time to properly block garment panels pays dividends for the final finishing off of your garment, especially if you are matching each joining stitch row for row or lace gap to lace gap.
The stitches you have used for the joining sides of your garment, play a large part in the sewing up technique that is best used. I have suggested some techniques below but suggest that you try a couple of methods on a small part of your project and see which you prefer for your final look and feel.
The following information has been distilled from Pauline Turner's book 'Finishing Techniques for Crochet' and my own experiences and I have also provided links to YouTube videos that show these techniques being used on crocheted garments:
Crochet stitch joins:
Double crochet (sc) - has a decent amount of elasticity so is great for garments that need to have movement and give to them. Double crochet with wrong sides facing (right sides together) and crochet through both loops of both stitches. This can add quite a bit of bulk to your seam.
Slip stitch - this has a lot less give than a double crochet (sc) join, but can be a neat, less bulky way of joining panels together. I like using this for joining lace panels together. Slip stitch with wrong sides facing (right sides together).
Lace join - increases the width of the piece by adding a crocheted lace join in the middle of the two panels. There are various patterns for this joining technique and the Celtic Lace Join was the nicest one that I found.


Sewing stitch joins:
Back stitch - is best used when you want as little movement as possible in your finished piece.
Whip stitch - creates a good invisible seam with a small amount of elasticity.
Mattress stitch - similar outcome to whip stitch but neatly lines the two panels up side by side rather than pulled together by the stitches. Worked with right side facing.
Weaving in ends
You will note that I haven't yet mentioned weaving in ends. That's because I don't do this until my projects have been washed, blocked, dried and sewn together. This means that the blocked fabric is in its final state and when I weave the ends in I can hide them well and know that the fabric is unlikely to change.
If you weave in the ends and trim them before blocking, then stretch the fabric through blocking, it can become uneven because of the woven stitches and/or the trimmed ends can start to poke out.
If I am being clever, I leave a long enough tail on the last stitch and use the tail when joining the garment panels together (if the tail is going to be in the right place for sewing up). This means that you have fewer ends to weave in.
Adding buttons and trims:
Buttons:
Almost every crafter I know has a drawer full of buttons. Some bought from yarn shows and others lovingly handed down in vintage button drawers. I have a bit of both and like my yarn stash, have more than I could ever use.
I rather suspect that sewing on a button is one of those things that many people wing and have never learned to do properly. I have scoured YouTube to find a short but helpful video on How to sew a button by hand that is secure and easy to use (not so tight that you can't get it through the buttonhole).
If you crocheted/knitted your garment with a particularly sturdy yarn, you might want to try using one of the plies to sew your button on with (so long as it doesn't break when you twang the two ends together). This can bring a level of finesse to your project, especially if you have contrast colour buttons.

As I live in the UK, I have also provided some shops that I use/admire for buttons:
- Textile Garden does a lovely range of buttons, ribbons and shawl pins. Maggie can often be found at yarn shows in the UK.
- Duttons for Buttons is a seller that I am yet to visit and it does exactly what it says on the tin - they sell buttons - lots of lovely buttons! Their range is huge (12,000 different buttons) across three shops in Harrogate, Ilkley and York.
- Charity shops - I often find that my local charity shops have a little basket of buttons that they have collected and they are great to rummage through.
Ribbons:
These can be a great addition to a cardigan as a button band or sewn into the neck nape area of a jumper - the part that you pull to take it off. This can help to strengthen specific parts of the garment and make it more durable.
Lots of ribbons are suitable and it is well worth keeping the little bits that you often get wrapped around gifts etc. It's a great way of reusing them rather than sending them to landfill /energy from waste and they are free.
If you don't have any ribbons and want to find some nice ones, I can help you there. I carry a range of ribbons (herringbone, crafters, festive forest, Nordic flake and vintage) that are the right width for button bands, have really lovely patterns on and are made not 15 miles from my home in Cheshire, England.

Pom poms and tassels:
Crocheted edges and colours:
You may get to the end of your project and find that you want to add a little bit of tszuj to your garment. I have Edie Eckman's 'Around the Corner Crochet Borders' and it is full of great border patterns that can easily be adapted to your garment.
Again there are lots of other books available, I am referencing this one because I own it and am happy to reference it.
You can also see from my baby cardigan that I have used a contrast colour for the edge that was added after blocking. I would love to say this was planned but actually, I ran out of yarn. It was a happy accident though, as I love the teal against the light blue. Sometimes adding a contrast colour from the opposite side of the colour wheel from your main colour can bring a garment to life.
There is a bucket load of theory behind the use of colour and this article neatly sums it up if you just want the basics.
Recording your process:
An integral part of my finishing process is recording what I have done with the project, yarns used, weights used etc. I record lots of project elements from the very inception of a design/ project right to the final dimensions. This allows me to go back and fondle a yarn that I have used previously, see whether I made any changes to the pattern and look through any specific notes that I left myself.

This isn't just important to me because I design, it's also important because if I love a pattern I will make it again and it's good to be able to go back to my notebook and see what I changed or did first, second, third time around.
On the most basic level, it's helpful to know what your tension/gauge was before blocking. As soon as you have blocked your item, that information is lost. I am often asked about recording part of my process and thought it was high time I wrote it down for others to see.
That's all folks
Well, that was a whopper of a post wasn’t it? Hopefully, you found lots of useful information, ideas and links in there.
If you fancy hearing from me more often, I have a monthly newsletter for Provenance Craft Co. which you can sign up to and also one for Fay DH Designs.
If you want to follow me, I am most active on Instagram as @provenance.craft.co and Pinterest as Provenance Craft Co.
I am also the host of The Crochet Circle Podcast which is available monthly on video and on and audio. And because I'm not busy enough, I have an Instagram account for that too - @crochet_circle_podcast
Happy washing, blocking and finishing my lovelies!
Fay x